Linear DNA
Introduction
In this page you will be able to find information about how prepare eGene™ constructs using either the NC3009 Solubility Tag eGene™ Prep Kit or NC3008 eGene™ Prep Kit - Flexivariant.
You can consult the eGene™ products page where you will find all the information about our product.
Either product (NC3008 or NC3009) can be used using this protocol to obtain Linear eGene™ constructs
Linear eGene™ Prep kit contents
In the eGene™ Prep kit (NC3008 or NC3009) you will find:
- Primer Mix: This will include eight or one formulations containing optimized concentrations of megaprimers corresponding to the left and right construct flanks, and universal forward and reverse terminal primers.
The eight megaprimer formulations allow the preparation of eight different linear expression constructs with or without varying N-terminal solubility tags (Table 1).
For the Flexivariant eGene™ Prep kit (NC3008) the only primer mix available in the kit is the non-solubility tag Strep Primer mix.
| Component | N-term Sol | Product Code | C-term DET | C-term PUR | eGene™ construct |
|---|---|---|---|---|---|
| P17-Strep Primer Mix | P17 | EG2-01 | Yes | Yes | P17-/POI/-DET-STREP |
| CUSF-Strep Primer Mix | CUSF | EG2-02 | Yes | Yes | CUSF-/POI/-DET-STREP |
| FH8-Strep Primer Mix | FH8 | EG2-03 | Yes | Yes | FH8-/POI/-DET-STREP |
| TRX-Strep Primer Mix | TRX | EG2-04 | Yes | Yes | TRX-/POI/-DET-STREP |
| ZZ-Strep Primer Mix | ZZ | EG2-05 | Yes | Yes | ZZ-/POI/-DET-STREP |
| SUMO-Strep Primer Mix | SUMO | EG2-06 | Yes | Yes | SUMO-/POI/-DET-STREP |
| SNUT-Strep Primer Mix | SNUT | EG2-07 | Yes | Yes | SNUT-/POI/-DET-STREP |
| Strep Primer Mix | - | EG2-08 | Yes | Yes | -/POI/-DET-STREP |
Table 1. Primer Mix components included in eGene™ Prep Kit. For NC3008 only Strep Primer mix is available
- Elution Buffer: required for the eProtein Discovery™ platform.
Before first use, leave the Elution Buffer to thaw on ice for about 2 hours. Once open, make small 1.5 mL aliquots, store at -80°C and treat as single use.
-
Re-amp Primer Mix for troubleshooting, or to produce larger quantities of DNA to scale up protein production (optional).
-
10x Control Template, supplied as a PCR positive control to verify that the prepared formulation and thermocycling parameters are correct.
User supplied reagents / components (not included in the kit)
- Synthesised DNA fragments corresponding to the genes of interest (GOI) pre-adapted with 3C and TEV sequences on 5’ and 3’ ends, respectively. The GOI can be from 125 to 2955 bp long. We recommend gBlocks™ by IDT designed using the eProtein Discovery software.
- High fidelity PCR mastermix. We recommend using: Platinum™ SuperFi II PCR Master Mixes or Phusion™ Plus PCR Master Mixes
- Nuclease free water (NFW)
- PCR purification kit (column- or bead-based methods)
- 1% (w/v) agarose gel
- DNA gel stain
- Loading buffer
- Electrophoresis running buffer
- DNA ladder
User supplied equipment
- Thermocycler
- Electrophoresis apparatus
- Gel doc or transilluminator
- Standard benchtop microcentrifuge
- Pipettes with disposable filter tips
- 0.2 mL thin-walled PCR tubes or 96-well PCR plate
eGene™ preparation workflow
To convert your synthesized DNA fragments into linear expression constructs successfully:
- During eGene™ DNA construct (prep or re-synthesis) purification, eGene™ Elution Buffer must be used to ensure compatibility with eProtein Discovery Cartridges. Sub-dilutions must also be performed using the eGene™ Elution Buffer.
- We recommend using filter tips throughout the protocol to prevent cross-contamination.
- When outsourcing linear DNA fragments, the length of the DNA of interest (excluding Nuclera adaptor sequences) should be between 125 and 2955 base pairs.
Diluting eGene™ constructs with reagents other than the specified eGene™ Elution Buffer is incompatible with the system and will prevent successful protein expression.
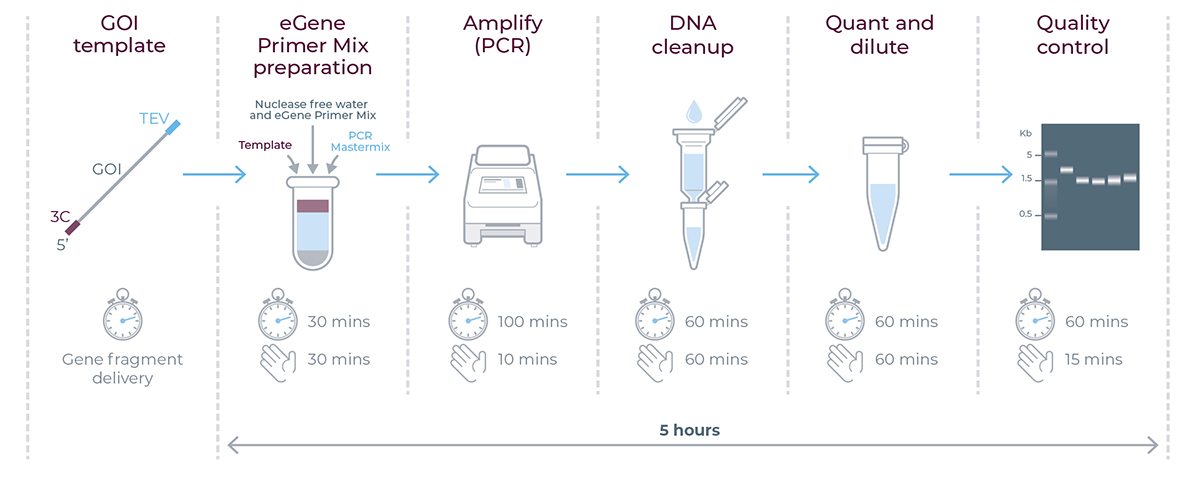 eGene workflow summary - timings applicable for generating eGene™ constructs using the eGene™ Prep Kit. For each step of the workflow, the clock indicates the total experiment time and the hand indicates the total hands-on time.
Preparation of the template DNA
If template DNA are gene fragments supplied in tube, follow the steps 1 to 6 to dilute it.
If template DNA are gene fragments supplied in a 96-well plate go forward to "Preparation of the template solutions" solutions section, as DNA fragments are already resuspended.
- Before opening the tube, spin it down in a microcentrifuge for 5 seconds to ensure all the lyophilized DNA fragment is at the bottom of the tube. The lyophilized DNA fragment pellet can be statically charged and adhere to the tube wall or cap, resulting in loss of material.
- Add a suitable buffer such as 0.1X TE or nuclease-free water, to reach a final concentration of 10 ng/µL. For example, if the tube has 1000 ng of lyophilized product, add 100 µL of molecular grade water, or a buffer to resuspend it.
- Vortex briefly to resuspend DNA fragments into solution.
- Either leave the solution at +4°C overnight or incubate at 50°C for 15–20 min. Both methods will ensure that the entire pellet will be resuspended in the buffer or nuclease-free water.
- Briefly vortex and centrifuge.
- Convert DNA concentration to molarity using the following formula:
Preparation of the template solutions
- PCR control template: In a 200 µL thin-walled PCR tube, add 1 µl of 10x Control Template to 9 µL of nuclease-free (NFW) water to obtain a Control Template solution at 2 nM and keep on ice.
- Gene of interest template: Prepare a 2 nM GOI template solution by diluting the required volume of GOI (calculated using the formula below) in 10 µL of nuclease-free water. Keep the solution on ice
Example: For a 2159 bp gene of interest obtained at 10 ng/μL, which corresponds to 7.5 nM, add 3.6 μL of DNA template to 10 μL of nuclease-free water (NFW).
Preparation of the PCR reaction mix
The assembly reaction consists of adding the template DNA to the reaction mix containing a Primer Mix and a 2x polymerase mastermix.
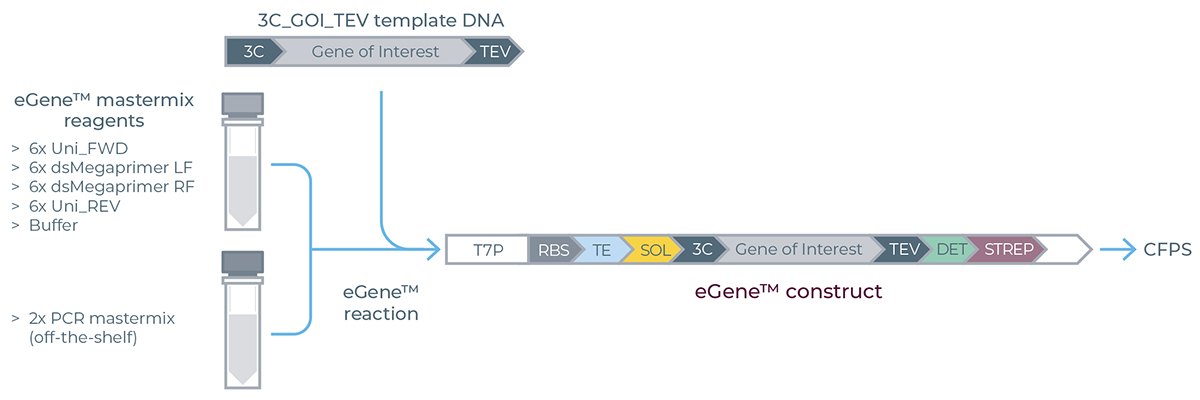
Overview of the eGene™ Prep Kit assembly reaction set-up. T7 promoter (T7p), Ribosome Binding Site (RBS), translation enhancer (TE), solubility tag (SOL), 3C (human rhinovirus) protease cleavage site (3C), TEV (Tobacco etch virus) protease cleavage site (TEV), detection tag (DET), Strep purification tag (STREP).
Depending if you are using the the eGene Solubility Tag or Flexivariant screen, choose one of the tab below to proceed to the preparation of the PCR reaction mix
- Solubility Tag
- Flexivariant
- Thaw on ice each of the individual vials containing the Primer Mixes. After use, refreeze any unused material. The number of reactions varies depending on the experimental format planned for the eProtein Discovery instrument:
- 3 proteins of interest with 8 eGene constructs for each protein
- 4 proteins of interest with 6 eGene constructs for each protein
- 6 proteins of interest with 4 eGene constructs for each protein
- Quick spin down the tube for 10 seconds using a microcentrifuge.
- To facilitate the workflow, you can prepare a mastermix for each GOI by adding nuclease-free water, 2x PCR mastermix, and GOI. Aliquot 50 µL of the mastermix into PCR strip tubes/wells, followed by the addition of 10 µL of the eGene Primer Mix into the respective tubes/wells. Prepare a negative control and a positive control independently.
Randomly select one of the 8 Primer Mix reagents provided in the kit for use in the two wells or PCR tubes designated for the positive and negative controls.
| Reagents | Reaction Volume |
|---|---|
| Nuclease free water (NFW) | 19 µL |
| 2X PCR mastermix (high fidelity PCR mastermix, user supplied) | 30 µL |
| Primer Mix | 10 µL |
| Gene of interest at 2 nM, or water (negative control), or Control Template (positive control) | 1 µL |
| Final volume (maximum recommended volume per reaction) | 60 µL |
- Thaw the vial containing the Primer Mix. After use, refreeze any unused material.
- Quick spin down the tube for 10 seconds using a microcentrifuge.
- Prepare the mastermix for the PCR reaction with nuclease free water, 2X PCR mastermix and Primer Mix.
| Reagents | Reaction Volume |
|---|---|
| Nuclease free water (NFW) | 19 µL |
| 2X PCR mastermix (high fidelity PCR mastermix, user supplied) | 30 µL |
| Primer Mix | 10 µL |
| Gene of interest at 2 nM, or water (negative control), or Control Template (positive control) | 1 µL |
| Final volume (maximum recommended volume per reaction) | 60 µL |
- Prepare a mastermix for 27 reactions by mixing the components indicated in table above. Do not add the DNA template at 2 nM in the master mix.
- Dispense 59 μL of mastermix prepared as outline in table above into each tube labelled 1-26.
- Dispense 1 μL of 2 nM template GOI directly into tubes labelled 1- 24.
- Dispense 1 uL of 2 nM Control Template in tube 25; this will be your Positive Control.
- Dispense 1 μL of NFW in tube 26; this will be your no template control.
PCR assembly
- Gently vortex the mixture to produce a homogeneous reaction, then centrifuge briefly to collect the solution at the bottom of the tube.
- Place your samples in a thermal block cycler and perform PCR using the parameters in Table below.
| PCR steps | Temperature | Time | Number of cycles |
|---|---|---|---|
| Pre-Incubation | 98°C | 30 sec | 1 |
| Denaturation | 98°C | 10 sec | 27 |
| Annealing | 60°C | 20 sec | |
| Elongation | 72°C* | 30 sec per kb** | |
| Final Elongation | 72°C* | 2 minutes | 1 |
* Elongation temperature: to be based on manufacturer’s recommendation.
** Elongation
time: to be based on manufacturer’s recommendation but should not be less than 30
seconds per kb of the final eGene™ construct.
Evaluation of the amplified DNA by agarose gel electrophoresis
- Prepare a 1% (w/v) agarose gel with a DNA gel stain in 1x Tris acetate EDTA (TAE) or 1x Tris-borate-EDTA (TBE) buffer.
- Using new wells or new PCR tubes, prepare 12 µL samples for loading on the gel as detailed in Table below.
| 6x gel loading dye | Nuclease free water | eGene™ DNA construct |
|---|---|---|
| 2 µL | 8 µL | 2 µL |
Sample preparation for agarose gel electrophoresis. Note: a bulk solution of ready-to-use 1x loading buffer can be made and stored at room temperature or 4°C.
- Load 10 µL of PCR products and control on 1% agarose gel along with an appropriate DNA ladder (1 kb).
If the purity of the eGene™ constructs is low with the presence of one or more extra band(s) on the gel, there is a risk to obtain the protein of interest with a significant amount of impurities.
For eGene™ constructs containing more than one band, a band-stab and reamplification is required using the Re-amp Primer Mix provided in the eGene™ Prep kit. The band-stab and reamplification protocols can be found in the Troubleshooting section of this document.
PCR purification
The PCR reactions must be cleaned using the DNA purification method of your choice, either column or bead-based methods. Gel extraction is not recommended as it might result in significant product yield loss.
The samples must be eluted using the Elution Buffer (50 µL) supplied in the eGene™ Prep kit to make them compatible with the eProtein Discovery cartridge.
Make sure the eGene™ Elution Buffer is at room temperature when eluting DNA. The eGene™ Elution Buffer is a HEPES buffer, pH 8.0, containing a surfactant.
DNA quantification
- It is recommended to carry out DNA quantification (ng/µL) using fluorescent dye-based methods, not spectrophotometric methods.
- Determine the length of the eGene™ using the calculator available on the eProtein Discovery Software or the formula below and Table 6.
The length of the GOI should not include the length of the 3C and TEV sequences.
The length of the Control Template supplied in the kit is 660 bp, 3C and TEV sequence lengths not included.
| Primer Mix | Total length of the flanks (bp) |
|---|---|
| P17-Strep | 1134 |
| CUSF-Strep | 1302 |
| FH8-Strep | 1239 |
| TRX-Strep | 1359 |
| ZZ-Strep | 1383 |
| SUMO-Strep | 1341 |
| SNUT-Strep | 1476 |
| -Strep only | 990 |
Total lengths of the N-terminal and C-terminal flanks to add to the gene of interest to determine the total length of the eGene™ constructs
- Calculate the molar concentration (nM) of the eGene™ constructs using the calculator available on the eProtein Discovery Software or the following formula:
Example: the molar concentration of a 1415 bp long eGene™ at 60 ng/µL is 68.6 nM
Note: If the DNA concentration is lower than 5 nM, please refer to the reamplification protocol in the troubleshooting section to generate more DNA.
eGene™ constructs normalization
To be compatible with the eProtein Discovery platform, all eGene™ constructs must be normalized to 5 nM using the Elution Buffer provided in the eGene™ Prep Kit.
60 µL of an eGene™ at 5 nM is sufficient for one experimental run on the eProtein Discovery instrument and a 200 µL scale-up experiment.
Determine the volume of eGene™ constructs to add to 60 μL of eGene™ Elution Buffer using the following formula:
Example: For a 2589 bp eGene™ obtained at 40 ng/μL, which corresponds to 25 nM, add 15 μL of DNA sample to 60 μL of eGene™ Elution Buffer.
Final gel QC
It is recommended to run 2 µL of the samples on a 1% agarose gel post PCR clean-up.
Note: This step is optional if you already evaluated the amplified DNA by electrophoresis after the PCR assembly.
eGene™ constructs must be of high purity since the input DNA sequence is transcribed in the Cell-free Protein Synthesis reaction and the subsequent mRNA is translated to the final protein of interest.
The quality of DNA generated using the eGene™ Prep Kit (NC3008 or NC3009) is illustrated in figure a (agarose gel) and b (electropherogram) below, showing a comparison of the PCR products from incorporating different solubility tags using the standard solubility tag screen, while keeping the ‘Gene of Interest’ (GOI) constant.
a 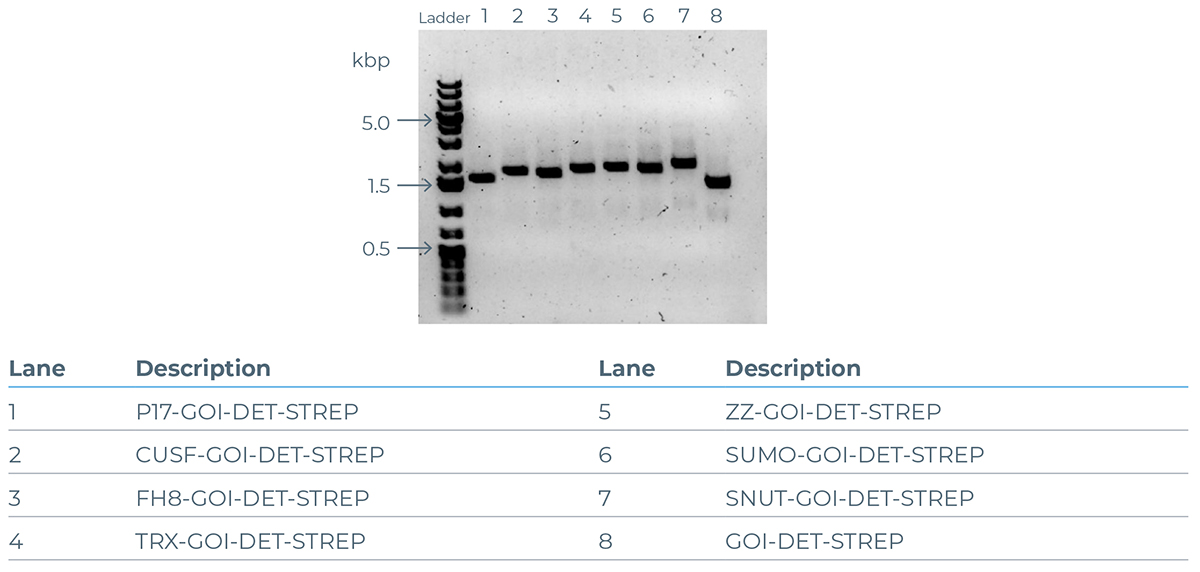
Example of an agarose gel illustrating the DNA bands generated from PCR products of the GOI CALM1 (UniProt ID P0DP23) expanded with different solubility tags.
b 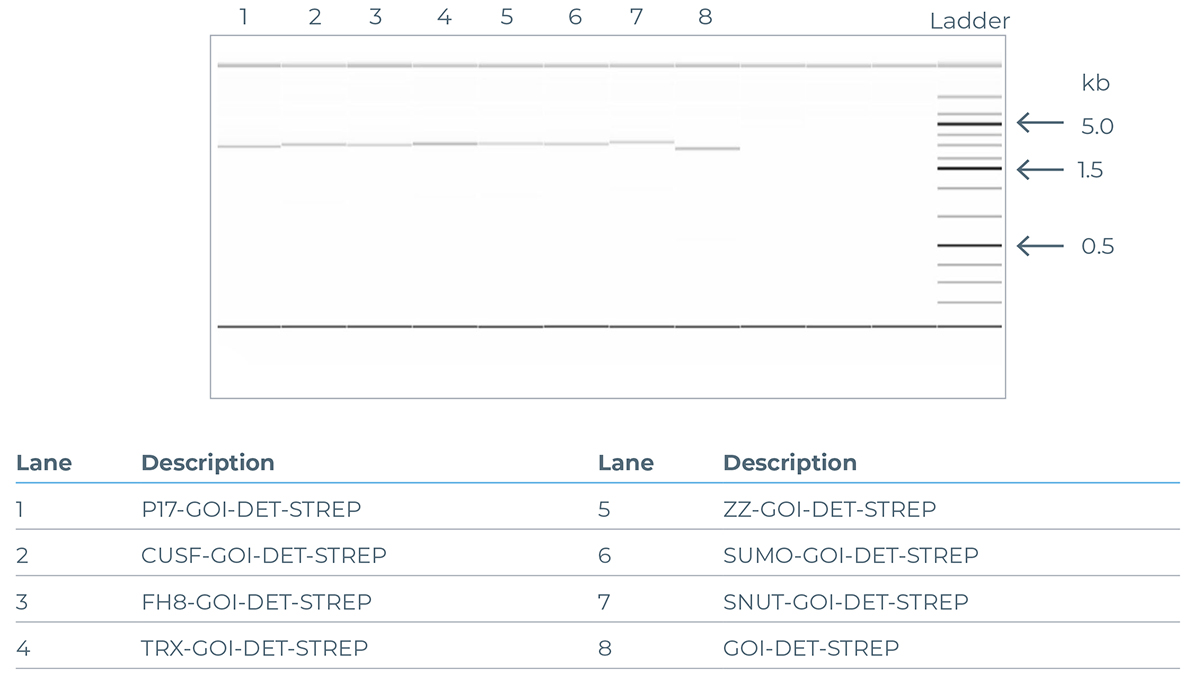
Example of a capillary electrophoresis generated electropherogram illustrating the DNA bands generated from PCR products of the GOI rpsA (UniProt ID P0AG67) expanded with different solubility tags
If the purity of the eGene™ constructs is low with the presence of one or more extra band(s) on the gel, there is a risk to obtain the protein of interest with a significant amount of impurities.
Troubleshooting: For eGene™ constructs containing more than one band, a band-stab and reamplification is required using the Re-amp Primer Mix provided in the eGene™ Prep kit. The band-stab and reamplification protocols can be found in the Troubleshooting section (link)
Storage of the eGene™ constructs
Purified and normalized eGene™ constructs can be stored at -20°C short term (days) or -80°C for long term storage.
eGene™ Optimization / Troubleshooting
Band-stab protocol
Always wear UV safety glasses when working with a transilluminator.
Overview: Band-stab is suggested to obtain pure eGene™ constructs directly from the eGene™ PCR assembly using the eGene™ Prep Kit.
It is a simple method to obtain single bands as compared to gel purification techniques which requires excision and purification of the DNA fragment from the agarose gel.
The method described in this section is adapted from the publication by Bjourson and Cooper (Bjourson AJ, Cooper JE. Band-stab PCR: a simple technique for the purification of individual PCR products. Nucleic Acids Res. 1992 Sep 11; 20(17): 4675).
An example of a band-stabbed gel is in figure below.
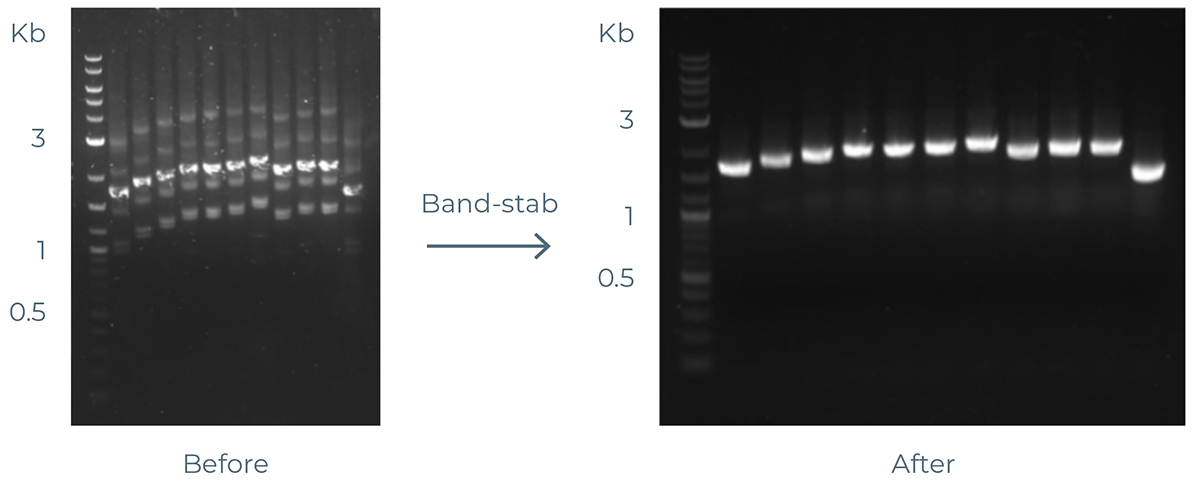 Example of band-stabbed gel.
- Run the eGene™ constructs showing non-specific bands on a 1 % (w/v) agarose gel, or use the gel made for the final gel QC step.
- Load 2 µL of purified product on the gel.
- Set-up the electrophoresis apparatus for 45 minutes at 120 Volts, or until the desired band is well separated.
- While the electrophoresis is running, prepare the reamplification PCR reaction as described in Section 2. Reamplification.
- When the electrophoresis run is complete, take the gel from the tray and take a picture using an imaging apparatus and locate where your desired bands are.
- Place the gel on the transilluminator and use the blue light setting.
- Locate your band of interest and take a P10 pipette with a P10 filter tip attached.
- Hold the pipette vertically on top of the desired band and stab the band three times per PCR reaction.
- Transfer the pipette tip into the PCR reamplification reaction mix. It is recommended to pipette up and down three times to release all the material from the pipette tip into the PCR reaction solution.
Note: avoid transferring pieces of gel into the PCR reaction mix as they may inhibit the amplification process
Reamplification
General information The reamplification employs the same principles of a regular PCR reaction. This method allows synthesizing more of a eGene™ construct, either collected from a band-stab protocol, or in the case the quantity is not sufficient for a use on the eProtein Discovery instrument or for a scale-up experiment.
Notes:
- Always use an original eGene™ assembly as template for PCR reamplification. It is not recommended to use a reamplified product as a template as this would increase the risk of mutations over the subsequent generations.
- The minimum number of reactions that should be prepared is 3 x 50 µL:
- The first reaction is with the template eGene™ construct
- The second reaction serves as a no template control.
- The third reaction is prepared as a spare reaction. Due to the different viscosities and temperatures of the reagents, the pipetting volumes can be inaccurate leading to shortage of reaction solution.
- If re-amplifying more than one construct, it is recommended to prepare a sufficient reaction solution containing all the components except the template that are subsequently added to the respective wells or tubes.
- Reamplification product lengths are 40 bp shorter than original eGene™ constructs due to the use of a nested primer pair to synthesize them.
Preparation of the eGene™ template DNA to be reamplified
- Prepare a 10 μL solution of the eGene™ template normalized to 2 nM and keep on ice. Example: For a 2159 bp gene of interest obtained at 10 ng/μL, which corresponds to 7.5 nM, add 3.6 μL of DNA template to 10 μL of nuclease-free water.
Preparation of the reamplification PCR reaction mix
- Thaw 2x PCR Mastermix and Re-amp Primer Mix at room temperature and spin down tube for 10 seconds at 1000 g.
- For each reamplification PCR reaction, add the components listed in Table 7 and keep the tubes or the PCR plate on ice
Note: An additional well or PCR tube should be used as negative control, using nuclease free water instead of the eGene™.
| Reagent | Reaction volume |
|---|---|
| Nuclease free water (NFW) | 21.5 µL |
| 2X PCR mastermix (high fidelity PCR mastermix, user supplied) | 25 µL |
| Re-amp Primer Mix | 2.5 µL |
| eGene™ DNA template, or nuclease free water | 1 µL |
| Final Volume | 50 µL |
Table 7. Preparation of the PCR reaction solutions.
Reamplification PCR reaction
- Gently vortex the mixture to produce a homogeneous reaction, then centrifuge briefly to collect the solution at the bottom of the tube.
- Place your samples in a thermal block cycler and perform PCR using the parameters in Table 8.
| PCR steps | Temperature | Time | Number of cycles |
|---|---|---|---|
| Pre-Incubation | 98°C | 30 sec | 1 |
| Denaturation | 98°C | 10 sec | 19 |
| Annealing | 60°C | 20 sec | |
| Elongation | 72°C* | 30 sec per kb** | |
| Final Elongation | 72°C* | 2 minutes | 1 |
Table 8. Thermocycler parameters
* Elongation temperature: to be based on manufacturer’s recommendation. ** Elongation time: to be based on manufacturer’s recommendation but should not be less than 30 seconds per kb of the final eGene™ construct.
- To evaluate, purify, quantify and normalize the obtained re-amplified eGene™ constructs, follow the same procedure as from section ‘Evaluation of the amplified DNA by agarose gel electrophoresis’.
| Additive | Additive Description | Additive Characteristics |
|---|---|---|
| Additive buffer | HEPES buffer pH 7.5 and surfactant | CFPS reaction buffer, dilution normalization |
| PDI + GSSG Mix | Protein disulfide isomerase and oxidized glutathione | Chaperone and redox modification to oxidizing environment to support disulfide bond formation |
| TrxB1 | Thioredoxin reductase | Protects proteins from oxidative aggregation and inactivation and acts as a reductase in redox regulation |
| DnaK Mix | Chaperone | DnaK mix Chaperone mix to support folding and prevent aggregation |
| Zinc chloride | Zinc chloride solution | Cofactor that can be required for folding, stability, or activity |
| Calcium chloride | Calcium chloride solution | Cofactor that can be required for compaction, folding, stabilization, or activity |
| Manganese chloride | Manganese chloride solution | Cofactor for metalloenzymes for structure and activity |
| Cofactor Mix | Mix of NAD, acetyl CoA, FAD, SAM, and PLP | Cofactors that assist in folding, stability and activity |
| GSSG | Oxidized glutathione | Redox modification to oxidizing environment |
| 3C protease | 3C protease solution | Protease to cleave off the N-terminal solubility tag at the specific aminoacid sequence (LEVLFQ/GP) |